Executive Summary
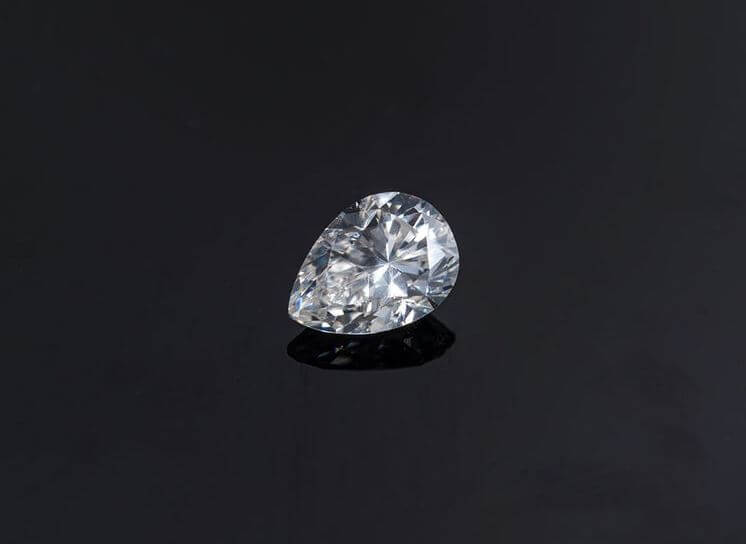
The pear cut diamond is said to be a combination of the marquise cut and the round cut diamond. The facets are arranged to maximize the brilliance and sparkle of the diamond. The practical way to describe the shape of this diamond is the word ‘teardrop’, cos that’s what it looks like. The way the pear diamond is worn is such that the tapered end is facing the fingers of the wearer. It is also one of the diamonds that have the illusion of making the fingers of the wearer appear longer and thinner than it really is.
The symmetry of this diamond cut is very important to the overall shape and look of the diamond. The upper curve and the lower curve of both sides of the diamond (the shoulders and the wings of the diamond) should form a symmetrical and uniform curve without any straight edges. The point at the tapered end and the apex or peak of the other end (round end) should align.
This diamond cut is also very susceptible to the bowtie effect which affects the brightness and outlook of the diamond, especially if it is very visible.
The ideal setting for the pear cut diamond should have a prong at the tip end of the diamond. This is the likeliest location for flaws and inclusions in the diamond because it was closest to the earth in the unrefined diamond. The prongs is meant to cover the inclusions.
This diamond naturally does not hide colors. But the possibility of placing it in different settings means that you could eventually compromise on the color grade and go down as much as H, I or J, depending on the setting.
Luckily, the pear diamond is able to mask inclusions in them. So you could save a lot of money buying an SI1 or SI2 diamond instead of a VVS2.
Lodewyk van Berquem of Bruges was the first person who cut a diamond in the shape of a pear. This happened way back in the middle of the 1400s. The reasoning behind this diamond cut was because the cutter wanted to optimize the amount of light that is reflected in the diamond. For this to happen, he had to make sure that he cut the diamond in a way that he would be able to polish all the different facets that are in the diamond. This is how the pear cut came into existence. And ever since it was introduced, it has thrived back and forth and has evolved through the years as well. But it is still popular today among diamond buyers.
Analysis of the PEAR Cut
This diamond is known to be somewhere in between the marquise cut and the round cut. The facet of this cut is arranged in such a way that it maximizes the brilliance and sparkle of the diamond. But unlike both, it is tapered at one end. The practical way to describe the shape of this diamond is the word ‘teardrop’, cos that’s practically what it looks like. The way the pear diamond is worn is such that the tapered end is facing the fingers of the wearer. And similar to some other diamond cuts, it also makes the fingers of the wearer appear longer and thinner than it really is.
The symmetry of this diamond cut is very important to the overall shape and look of the diamond. The pear diamond should have excellent symmetry or at the very least, the symmetry should be rated very excellently before you buy it. The upper curve and the lower curve of both sides of the diamond (the shoulders and the wings of the diamond) should form a symmetrical and uniform curve without any straight edges.

The point at the tapered end and the apex or peak of the other end (round end) should align. The rounded end of the diamond should not be narrow or squat but should appear like a semi-circle.
When you see a pear diamond that appears squatty or squares off, it usually is an issue caused by the cutters. This happens when the cutters allow more of the rough stone than they should in a bid to add more weight to the diamond. They usually add more girth to either of the ends of the diamond and this is what gives it the squatty appearance.
The length to width ratio of pear cut diamond of the same size and weight may differ considerably among themselves. This difference is due to the personal difference of the buyers. The ideal length to width ratio of the pear cut diamond is between 1.40 – 1.70 but then you can opt for a length to width ratio of your choice depending on if you prefer the diamond to be thin or wide. One important thing you must pay attention to when determining your preferred length to width ratio is the setting you will be putting the diamond in. if you are going to be setting the diamond in the setting of a dangling earring, then the ideal diamond shape is the narrow one. But if you are going to be setting it in a solitaire ring, the ideal shape would be the wider diamond. These factors would influence your choice of length to width ratio.
One thing you must watch out for in a pear-shaped diamond before going ahead to purchase it is the bow tie effect. The thing is by reviewing the dimensions or certificates of the diamond, you will not be able to ascertain whether or not it has the bow tie effect. So you have to ensure that you inspect the diamond physically with your eyes because that is the only way you can confirm that it does not have the bow tie. What is known as the bow tie effect is a dark shade across the center of the diamond? This shade takes the shape of a bow tie (wider towards the edges and thins out towards the center). Hence, the name ‘the bow tie effect’. It is caused by the cutters’ error in aligning the facets of the diamond. This misalignment causes an interference with the diamond’s light and gives it the bowtie across its center. The color of the bow tie can vary from black to light gray and this affects its visibility. Some bowtie can be very faint and almost invisible while many others may be extremely visible. The darker the bowtie is, the more visible it is. The more visible the bow tie is, the farther you should be from the diamond.
The ideal setting for the pear cut diamond should have a prong at the tip end of the diamond. The reason is simple. This tip or pointed end of the diamond was the closest point to the outside part of the unrefined stone, so it’s only natural that there are flaws and inclusions around that part of the diamond. If you do not set the diamond in a prong, these inclusions and flaws will be easily detectable but setting them in that prong covers that edge where the inclusions would appear naturally. And whatever inclusions are present in the diamond will be hidden by the prong.
The table below gives a guideline to help you evaluate the cut of the pear diamond.
| EXCELLENT | VERY GOOD | GOOD | FAIR | POOR | |
| Table | 53 – 63 | 52 or 64 – 65 | 51 or 66 – 68 | 50 or 69 – 70 | < 50 or > 70 |
| Depth | 58 – 62 | 56 – 57.9 or 62.1 – 66 | 53 – 55.9 or 66.1 – 71 | 50 – 52.9 or 71.1 – 74 | < 50 or > 74 |
| Girdle |
Very thin – slightly thick |
Very thin to slightly thick | Very thin to thick | Very thin to very thick | Ex. Thin to ex. Thick |
| Culet | None | Very small | Small | Medium | > medium |
| Length to width ratio | 1.45 – 1.55 | 1.40 – 1.44 or 1.56 – 1.65 | 1.35 – 1.39 or 1.66 – 1.80 | 1.25 – 1.34 or 1.81 – 2.00 | > 1.25 or < 2.00 |
The Color of the Pear Cut Diamond
Generally, the pear cut diamonds allow colors to show more expressly. Unlike other diamond cuts, like the round cut, which hide colors, this diamond cut doesn’t hide colors at all. However, the color is usually more obvious in larger pear diamond than in smaller pear diamonds.
The tip or pointed end of the diamond is where the colors are more likely to be obvious and in full display, so if you want to buy a diamond with a low color grade, this edge is where you will have to consider the most.
For pear cut, the setting where you will be placing the diamond should determine the color grade of the diamond that you are buying. If you will be setting the diamond in a platinum solitaire or white gold engagement ring, the best color grade to consider is the H grade. This will give you the best value for your money.
If you are settling for the yellow gold or rose gold, you can go a little farther down the color grade and settle for the J grade. The diamond will still appear white with this setting.
If you have decided to settle for the halo setting with side stones, your best bet would be to make sure that the color of the diamond matches with the side stones surrounding it. Diamonds in the G or H color grades match this setting very perfectly. But in the case where you are working with a tighter budget, you can go a little down the color grade and settle for the I grade diamond. This would do the job fairly well too.
It is already established that colors are more shown in larger diamonds than in smaller ones. So if you are buying a large diamond (> 2 ct. weight), the minimum color for your diamonds should be a grade higher than the above-mentioned recommendations.
If you want an ice-white diamond, the best diamonds to buy are those in the color grades between D and F. but if you’re okay with just a normal colorless diamonds, then you should settle for diamonds within the color grades of G, H or I. your choice will depend on factors like the setting and the size of the diamond.
Irrespective of the setting or size of the diamond, an important thing to consider when making the decision on which color grade to settle is its affordability (the size of your budget). No matter how much recommendations we make based on size and setting, it’s requisite that you can afford the stated color grade. You can settle for the highest recommended color grade if you can afford it. You can buy between D – F. but if you are working on a restricted budget, you can settle for one between G – J grade. For the best color to price optimization, you should settle for grade G or H.
The table below shows a guide for evaluating the color of the pear cut diamond.
| EXCELLENT | VERY GOOD | GOOD | FAIR | POOR | |
| < .50 ct. | D – G | H – I | J – K | L – M | > M |
| .51 – 1.0 ct. | D – F | G | H – I | J – K | > K |
| 1.0 – 2.0 ct. | D – F | D – F | G – H | I – J | > J |
| >2.0 ct. | D – F | D – F | G | H – I | > I |
| Fluorescence | None | Faint – medium | Strong | Very Strong | Very Strong |
Clarity of the Pear Cut Diamond
Pear shape diamond has an important attribute of being able to mask inclusions in them. This can, therefore, save you some money when buying a pear cut diamond as it allows you to go a little further down the clarity grade. For example, you might buy a diamond cut (without that ability to mask inclusions) that has a clarity grade of SI1, but if you are buying a pear cut diamond which is an equivalent of the previous one, you can decide to buy one with a clarity grade of SI2 and it will look just the same. Clarity is an important factor when evaluating the price of a diamond and the price difference between two adjacent clarity grades can be quite robust. So the pear cut diamond’s ability to mask inclusions is a welcome bonus to your pocket, as you can go down the clarity grade and save some cash.
Whether you are a novice at buying a diamond or you are a ‘professional diamond buyer’, whether it is your first time buying a diamond or your hundredth time. It doesn’t matter how many diamonds you have bought, you will agree with me that the least requirement you can have when considering the clarity of a diamond is that the diamond must not contain any visible inclusions. As far as the naked eye is concerned, you shouldn’t be looking in a diamond and you’re spotting flaws in it. It must appear colorless to the eye. The idea is, no matter the clarity grade of the diamond in your hands, people don’t get to ask you that. What they want to see on your fingers, your ears or around your neck is a clear diamond. This should be your motivation when considering the clarity grade of a diamond. So the important thing is the clarity to the eye, not the clarity grade itself. This is a good way to save money on your diamond. You can buy the internally flawless diamond if you can afford it. But it would not really make much difference to people admiring it on you than when you buy an SI1 clarity diamond (also clear to the eye). What they see in both cases is a clear diamond. But then, it depends on your preference and of course your budget.
| EXCELLENT | VERY GOOD | GOOD | FAIR | POOR | |
| .50 ct. | FL – VS2 | SI1 – SI2 | I1 | I2 | > I2 |
| .51 – 1.0 ct. | FL – VS1 | VS2 – SI1 | SI2 | I1 – I2 | > I2 |
| 1.0 – 2.0 ct. | FL – VVS2 | VS1 – VS2 | SI1 – SI2 | I1 | > I1 |
| > 2.0 ct. | FL – VVS2 | VS1 – VS2 | SI1 | SI2 | > SI2 |
Carat Weight of the Diamond
The proportions of the cut for different pear cut diamonds vary very broadly. This results in varying sizes of the pear cut diamonds and consequently different carat weight.
| Size of pear cut diamond | Corresponding carat weight of pear cut diamond |
| 3.0 x 2.0 mm | 0.13 ct. |
| 4.0 x 2.5 mm | 0.18 ct. |
| 4.0 x 3.0 mm | 0.21 ct. |
| 5.0 x 3.0 mm | 0.25 ct. |
| 5.0 x 4.0 mm | 0.35 ct. |
| 6.0 x 4.0 mm | 0.50 ct. |
| 6.5 x 4.5 mm | 0.60 ct. |
| 7.0 x 5.0 mm | 0.75 ct. |
| 7.5 x 5.5 mm | 0.85 ct. |
| 7.7 x 5.7 mm | 1.00 ct. |
| 8.0 x 6.0 mm | 1.25 ct. |
| 8.5 x 6.5 mm | 1.50 ct. |
| 10.0 x 6.0 mm | 1.71 ct. |
| 8.7 x 6.7 mm | 1.80 ct. |
| 9.0 x 7.0 mm | 2.00 ct. |
| 10.0 x 8.00 mm | 2.50 ct. |
Pricing Of Diamonds
Like all other members of the 4Cs of diamonds (cut, color, clarity, and carat weight), carat weight plays a very big role in determining the price of the diamond.
These 4Cs are the major factors that determine a diamond’s price. If you find a pear diamond is well cut with excellent symmetry, a good sparkle, and brilliance, and it does not have the bow tie effect, you will expect such a diamond to be expensive. Especially when you compare it to other diamond of the same cut that has the bow tie effect and the symmetry is not excellent. These cut proportions affect the diamond’s price. In fact, two pear diamond with the same symmetry and other cut proportion equal but with varying degrees of the bow tie effect will have different prices.
The different color grades also affect the diamond’s prices. Ideally, it is impossible to detect the difference in color grades of diamonds especially if the color grades are adjacent and not far apart. It takes a trained gemologist to detect them. But many buyers just like to enjoy the feel of the higher color grades and would prefer to settle for them. So the prices are driven up by the number of people demanding for diamonds in specific color grade. But ideally, in a situation where diamonds are not graded based on colors, diamond prices wouldn’t be so high because people wouldn’t be able to differentiate the colors. So it wouldn’t really be a factor for determining prices.
The clarity grade of a diamond also determines its price. Just like colors, the difference in the clarity of adjacent grades is also undetectable to the untrained eye. But the grading does a lot of wonders to the pricing of the diamonds. Although they might both appear flawless to the eye, you definitely would not be paying the same price for a diamond without any inclusions and the one with inclusions that you cannot see. The invisibility of the inclusion definitely doesn’t exclude its presence.


